Showing posts with label art project. Show all posts

Monday, August 25, 2014

Homeschool Curriculum Review - See The Light Art Lessons

Several weeks ago I came across the site See The Light Shine and their art curriculum.  From the previews of the art DVD's this curriculum looked like something my daughter (and I) would love, and I am pleased to say, we do love this curriculum very much!  I wanted to give you an honest review of it in case you are looking for an excellent art curriculum for your student.

The first thing I love about the See The Light Shine Curriculum is that it's integrated with the Bible.  Their Bible Story DVD's teach art by taking kids through Bible stories and having them illustrate scenes or concepts from the story.  We have the 'God's Runaway' DVD which is about Jonah.  There's an illustrated Bible story (my 6 year old loved it and watched it 3 times before we even got to the art lessons, and I was impressed with it's quality), and then there are three lessons based on the story, as well as extra videos.  She especially liked the lesson on creative lettering, where she drew a whale and wrote 'Obey' in it's mouth.  See The Light Shine's other DVD art courses also integrate the Bible even though they may not be based on a specific story.

The next thing I love about these art DVD's is how easy they are.  My 6 year old loves to draw but has never had any instruction in drawing before.  The lessons are so easy and step by step that it's impossible not to be able to follow them.  Our next purchase from them will be their Year 1 Art Class Fundamentals set, which starts out teaching kids how to hold a pencil for drawing and how to make certain types of lines, and works all the way up to more advanced skills.  You can check out one of the lessons below:


Some of the lessons on the God's Runaway DVD were a little too involved for my 6 year old, but she was able to get through a lot of it.  The main reason we didn't complete one of the lessons all the way through was just because we didn't have the black light, which you can buy for just a few dollars from the See The Light Shine website.  Instead of using the blacklight and neon colored pencils, she chose her own colors of colored pencils, and completed the art project that way.  She loved the result, and it now hangs on the fridge where she shows it off to anyone who comes over.

Because it's video instruction, I set her up with her art supplies and turned the DVD onto the lesson she wanted to do.  I gave her the remote and she was able to pause it when she needed to so she could take her time to follow the step by step instructions.  When she was ready to move on, she would hit the play button and keep going.  Because we started this DVD in the summer instead of during our regular school year, she's had time to watch the lessons several times and has enjoyed doing the art projects over and over, getting better results each time.  She actually prefers watching the lesson once all the way through without her art supplies, and then watching it again with her art supplies ready to draw so she knows what's going on and what she's expected to do.

I want to mention here how positive the teachers are in these courses.  They make it fun to watch and easy to follow.  I don't know if I would recommend the courses for someone under the age of 6, but I would definitely recommend the See The Light Shine curriculum to students ages 6-19.  I think that even students who have had some instruction in art before would benefit from these courses.

My daughter and I are both looking forward to doing the Art Class year 1 course this year for first grade, and as soon as we're done with those we'll get some of the Art Project DVD's like the one on cartooning.  I'm also looking forward to the art history she'll be learning throughout the year in these courses.

To recap:

The Positives
- Easy step by step that kids ages 6-19 can follow
- Bible integrated
- Interesting art projects and subjects
- Builds precept upon precept so kids start out with something easy and work up to more in depth techniques
- Positive teachers
- Can use similar art supplies if you don't have the exact ones they ask you to use

The Negatives
 - There really aren't any that I have found aside from that it's probably not suitable for children under the age of 6.

If you have any questions that I haven't answered, I'd love to answer them for you.  Leave your questions in the comments below.

Note: This is an honest review.  I have not received payment for this review.  I did receive a review copy of God's Runaway.

Online homeschooling reviews

Thursday, November 21, 2013

Thanksgiving Videos and Activities


Thanksgiving is almost here and some of you (like myself) may be scrambling to find some good activities/videos to watch with your home schooled cubs about this holiday (at least if you're in America).  Fear not!  I've got you covered.

Here's a really good video about the true origins of the American Thanksgiving.  Very informative for such a short video.  My Kindergartener was able to sit through it and has asked to watch it again several times.


Also here's another video, though this one is for older kids as it has some violence in it.  It is specifically about the pilgrims and the Native Americans.


Ok, so you've got some educational value to give your cub now, but what about fun activities for them to do?  Well, we all know you can draw a hand turkey and color it, but there's got to be something better than that, right?

Check out our options this year:

http://www.thepickyapple.com/blog/2010/11/18/turkey-paper-bag-puppets/
The Picky Apple will show you how to make awesome turkey hand puppets.  We made one (not this one) and gave it some sparkle with our favorite... glitter glue.


http://lioncubschool.blogspot.com/2013/11/cheerio-turkey-integrating-math-and.html
You can also check out how to make our Cheerio Turkey here, or for a less flashy yet still tasteful version, make it out of Fruit Loops.
http://lioncubschool.blogspot.com/2013/11/easy-placemats.html
Instead of making a pumpkin place mat, why not make a turkey place mat?  Or a settler place mat?  Or how about one with corn and fish?  Check out the tutorial here.


http://www.crafts-for-all-seasons.com/thankful-turkey-craft.html
If you're feeling in the thankful mood or want to teach the cubs about thankfulness, head over to Crafts For All Seasons to learn how to make this Thankful Turkey.


Or if you really want to get away from turkey crafts, make a thankful leaf wall decoration!  I've also seen thankful trees being made!


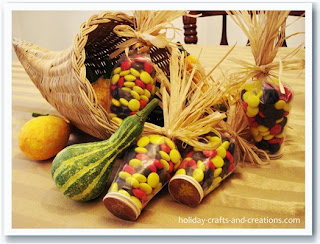
http://www.holiday-crafts-and-creations.com/thanksgiving-crafts-to-make.html
For a more involved and tastier project, make some Indian Corn place cards with Holiday Crafts and Creations!  Yum.


Other ideas:

- How about making a Lego re-creation of the first Thanksgiving?

- The kids could put on a 2-5 minute Thanksgiving play for the family on Thanksgiving day (or a puppet show).

- You can take the kids to the local mission to donate food or help prepare food on Thanksgiving or the day before Thanksgiving to teach them about giving to others.

- You can let them pick out canned foods to donate and take them to the local food bank to donate food to teach them about giving back.

- You can adopt a needy family and invite them to Thanksgiving to give them some more things to be thankful for :)

- You and the kids can take leftovers from Thanksgiving night or make up plates of Thanksgiving dinner to take to homeless people who live on the streets.  Pack it up on a paper plate and cover it in tin foil.  Be sure to take napkins and plastic forks/spoons with you, as well as a thermos of coffee with creamer in it and some large paper cups.  They will be so grateful!

- Along with taking food to homeless people on the streets, you can also prepare small care packages for them to give to them.  Some things you might include are: 
  • Hand lotion
  • Sanitizer
  • Small bottles of shampoo
  • Toothpaste and new Toothbrush
  • Tissue paper
  • Feminine products if you're going to give it to women
  • A zip lock bag of dog food for those homeless people with pets
  • New socks
  • One size fits all gloves
  • One size fits all beanies
  • A $5 calling card so they can call their loved ones
  • Individually wrapped candy
  • Gift cards to somewhere they can get their hair cut
  • Shirts in good condition
  • Bottled water
  • Fresh fruit
  • Granola bars
  • Energy bars
  • Individually wrapped cookies (or home made cookies in zip lock bags)
  • Extra blankets if you can afford them or have them.  
...These are just ideas of what you might give, obviously you don't have to give everything on the list.


Don't forget that it doesn't just have to be an art project that you do to get the kids involved with Thanksgiving this year.  They have things to be thankful for, but they can also help give other people things to be thankful for.

Do you have ideas for what your cubs can do on or around Thanksgiving!  Let us know in a comment :)


Easy Placemats

At the start of October my Kindergartener wanted to make some fall decorations so I came up with these easy place mats.


Supplies we used:

- Scissors
- Glue Stick
- Marker
- Crayons
- Pencil
- Colored Paper (computer or construciton)
- Laminator
- Lamination sheets

Step 1 - I drew a pumpkin shape out of orange paper, and eye and mouth shapes out of white paper we'd colored yellow (or you could use yellow paper).  Then she helped me cut them out, and colored the pumpkin with more orange crayons.  We glued it together with a glue stick on black paper.

Step 2 - We flipped the paper over and began making the candy corns.  I drew rounded triangle shapes on white computer paper, and she and I colored them in.  Then I cut them and she glued them to the back of the black paper wherever she pleased (we did it assembly line style to save some time).

Step 3 - We put it in a lamination sheet and ran it through the laminator (twice because it was thick).  And Ta-da!  A water proof seasonal place mat she can use that I can clean without ruining.  To clean it I just put it in the sink and wash with soap and a sponge like normal.

Note: I realize you might not have a laminator.  As a home school mom though I felt like it was going to be an essential part of school, and they happened to have one on sale at Wal-Mart for $24 at the time and the lamination sheets were about $10 for a large package.

The plus side is that if you do have a laminator, you can make as many place mats as you like and make them for every holiday season.  Take note however that you're using a piece of paper that is the correct size for your lamination sheets and will have enough room left over to give a little lip on the sheets to bond together.

Questions?  Comments?  Do you have some great projects like these?  Let us know in a comment!  We love to hear from you!

Digestive Tract Project


This project was one of those spontaneous moments spurred on by the curious nature of my daughter.  I don't remember what she'd asked me specifically about her digestive tract, but the answer was a lot more complicated than one or two sentences, so we turned it into an afternoon project instead.


Supplies we used:
- Colored computer paper
- Tape
- Pencil
- Markers
- Crayons
- Glitter Glue (dollar store)
- Computer to look up digestive tract parts on Google

We started by tracing her on paper in pencil then going over it in marker.  Then I drew in all the parts of the digestive tract (thank you Google), and drew lines from each part out to the side.  


We also drew a hamburger at the top and a line going into the mouth.  From there we went from the mouth down, she labeling and me explaining what each body part did to digest the food that goes into her mouth and what each part was called.  After that she colored it all in (and as she colored each part we talked about it again).

When it was all colored, we took glitter glue from the Dollar store and followed the path of that drawn hamburger down through her digestive tract and right out as waste.  We both had a good time doing this project and she learned a lot.  This would be a good project for Kindergarten and up.  Obviously the older the kids are the less help they will need labeling parts.


Questions?  Comments?  Do you have great projects like this you want to share?   Let us know in a comment below, I love to hear from you!