


If you're like most parents, you don't have $500 - $1,000 to spend on a professional photographer who will give you around 10 photos. You probably have a camera though. It might not be a DSLR (Digital Single Lens Reflex), but is probably good enough to capture your memories. Here are 10 basic tips for better photos of your kids and family.
1) Compose Your Photos
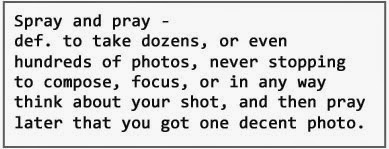 Do not, I repeat, do not be a 'spray and pray' or a point and shoot photographer. Composition is important. That is one of the things you are paying big money for when you hire a professional, is the ability to compose a photo in a way that is not only pleasing to the eye, but that makes sense. The easiest thing you can do for composition is to use the rule of thirds, explained in our post here. There are of course many compositional rules, but the rule of thirds is a great way to get started. You can also try 'filling the frame' (leave no empty space in the photo, fill the photo with a face).
2) Think About Lighting
Taking a photo in direct sunlight is one of the worst things you can do to a photograph. Try taking photos on a cloudy day, or if it is a sunny day, take your photos in the shade. You can also buy a cheap 5 in 1 reflector/light diffuser to help diffuse that direct sunlight. Something else to avoid is the on camera flash. Don't use the on board flash unless it's an emergency and you have to. Professional photographers use flashes (sometimes several for one shot), but they are usually used with a diffuser. The regular on board flash creates a harsh light (about as bad as direct sunlight) on the face, and harsh sharp shadows behind the subject. If you don't have a flash with a diffuser, use natural light and a reflector. Try placing your subject next to a window inside, or in the shade outside.


3) Dress For Photos
 I usually tell my clients to dress in solid colors or simple patterns. Complicated patterns (like floral) should be avoided because they don't show up well on camera and make the photo look too busy. The most pattern you should have is a simple plaid, stripes, or polka dots. You should also avoid shirts with logos, cartoon characters, symbols, words, or pictures on them because they really date a photo. It might be your child's favorite shirt, but it's best to avoid them for high quality photos. The final thing I usually tell clients when going out for a family photo shoot, is not to dress too matchy matchy. Long gone are the days of the entire family wearing matching outfits. For family photos you should choose 1-3 colors, or 1 or 2 colors and a pattern to repeat from family member to family member. I had one couple where the man wore a red shirt, and the woman wore a red scarf, and this was enough to unify the photos of them. Another family chose whites, purples, and blacks. Another family had each family member wear a scarf but the colors were all different.
4) Edit Your Photos
 I know not everyone has the time to learn Photoshop or Lightroom, or has the money to purchase these programs (although recently Adobe has been doing a 2 in 1 package of Photoshop and Lightroom for $10/month). You can find some free programs out there to edit your photos with. With a JPEG photo (This is what cell phones and regular digital cameras take) there's not too much you can do to fix lighting once the photo has been taken (so do it right in camera while you take the picture). But you can use a clone tool to remove blemishes, remove distracting elements from the background, level the horizon if you didn't do it in camera, and crop if necessary. Programs like Photoshop and Photoshop Elements also allow you to apply photo filters for an easy upgrade to your photos. Now there is such a thing as too much editing. I hate seeing photos that have been over edited, especially by those cell phone apps. They just look tacky when there is too much editing to a photo. Take a look at family photos you really like online, and see what kind of editing has been done to those photos. Then try to replicate that look. There are thousands of free tutorials out there online and on YouTube for editing photos.
5) Choose A Pleasing Background
 There are two really good ways to get a pleasing background. The first is to have a DSLR and lens that will give you the ability to get a shallow depth of field (the person will be in focus, but the background will be blurred). When you have a shallow depth of field, the background just becomes colors and you can't see the car, or trash can in the back of your subject. If you have a cell phone camera or regular point and shoot camera, this probably isn't an option for you. The second possibility falls under composition. Position your subject where there's not a lot of distracting objects behind them. You can put them up against a wall with a cool texture (think rock, concrete, or bricks), you can put them with foliage behind them, or lay them down on leaves, grass, or a hardwood floor and take the photo from above. The important thing is to look at the background before you take the photo. Things like people walking behind your subject, trash cans, cars, light poles, or garbage will all be distracting to the main subject.
6) Think About Posing
 A lot of times people say, "I'm not photogenic." That's not usually true though. Usually what happens is someone takes a photo of them straight on and it's not appealing. Even a skinny person can be made to look fat in a photo. This site has a few good tips on how to pose your subjects for flattering photos. One thing I've noticed, is that most kids automatically pose themselves in an way that is both comfortable and pleasing on camera. Sometimes they need direction, but not always. It's important that whoever you're photographing feels comfortable. If they are uncomfortable in a way you have posed them, it will translate to their face and to the photo, and the photo will look awkward. You want your photos to look natural and easy. It's ok to give direction, but make it clear that if your subject has an idea for how to sit or stand, you can try that too. Do not force your subject to pose in a certain way.
 7) Don't Have Your Subjects Say "Cheese"
"Say cheese," is dead. Don't do it. Don't ask others to do it. Having someone look at the camera and say "cheese" makes the person smile uncomfortably. The smile never reaches the eyes when they are forced to say something. Instead, talk to your subject, make them comfortable, joke with them, and capture the photo when they're laughing. Some adults and teens can smile if you tell them to without it looking awkward, but this is not the case with most people (and is almost never the case with children). A forced smile just includes the lips. A genuine smile reaches the eyes, and the corners of the eyes will crease slightly. Some of the best photos I have captured have been when the subject is laughing, or is completely relaxed and comfortable.
8) Try Different Angles
 Once your subject is posed comfortably, move around them and try different angles. Also, have them look at the camera, have them look over your shoulder, have them look up, have them look down, have them look out in the distance. You don't have to do this every time, but by having them look somewhere other than the camera, and by having you move around them, above them, or below them (just don't shoot up the nose), you can capture a lot of different photos with different feelings as opposed to just straight on. One thing to remember with kids (and pets) is not to stand and shoot down at them. If it's an intentional downward angle, get up high, but generally speaking it's much better to get down on the level of the child so that the camera is at their eye level. Doing this makes the photo and composition look intentional, instead of just being a snapshot (spray and pray).
9) Don't Get Frustrated
 It's easy to get frustrated with children (especially young children) when taking photos. They don't want to sit still, they don't like the pose you want, they don't want to look at the camera, they are hungry or tired or overwhelmed and don't want to smile, or they might even be crying. It's ok. Take a step back and think about why you want to capture these photos. You want a happy memory, don't you? Or you want to capture them just as they are at this precious age. If they are uncomfortable, feel forced, or think mom or dad is angry at them, it will show in the photos and won't look like you captured a beautiful moment in their young life. Instead of getting frustrated, stay calm, talk with them, joke with them, maybe let them play for a while and follow them around (candids of kids can turn out great)! That being said, if they are crying, snap a few pictures of that too. Kids cry, and photos like that can be powerful or sometimes even cute.
10) The Camera Isn't All About Mega Pixels
Yes, a higher mega pixel camera can give you a higher quality of photo, but this isn't the only thing that should determine your purchase or use of a specific camera. And while I'm thinking about it, let me point out that if you intend on printing your photos, your camera should be set to the highest file size and the finest quality. There are a lot of different things to consider when purchasing or using a camera. Think about the following things:
How often are you going to use the camera? Is it going to go everywhere with you? Are you going to be an amateur photographer, or are you good with snapshots? What is your budget?
If you want something small and compact that you can slip into a pocket, then a small point and shoot might be for you. Keep in mind that point and shoots usually have smaller file sizes (not so good for printing), only shoot in JPEG (not so good for editing), and give the user very little degree of control over what they're doing (if you're good with just auto, then go with this type of camera). This type of camera can be picked up for under a hundred dollars.
 If you want to learn photography, shoot in RAW (more ability to edit photos later on), have a greater degree of control over your camera and still have the ability to use auto focus when you need it, then an entry level DSLR (Digital Single Lens Reflex) camera might be for you. You can pick these up for between $300-$600 for an entry level, and between $1,000-$3,000 for a professional level camera. If you buy one, try to get one that comes with a kit lens (usually this will be an 18-55mm). I have a Pentax K-30. I like it because it is 100% weather sealed and so are the lenses that are made for it. It has a nice point auto focusing system, and full manual control when needed. It's a very high quality camera for an entry level, and reasonably priced. The nice thing about Pentax is that they backwards engineer their cameras to fit with the previously made lenses.

 There is also a third option, and that is the high-end point and shoot. The high end point and shoots look sort of like a DSLR, but don't have a detachable lens. They have some degree of control over the camera outside of auto mode, but not complete control. I have a Canon SX-40 HS (shoots in RAW if you hack it.... I believe the Canon SX 50-HS does shoot in RAW though). This camera has a super zoom so I use it for wild life photography. It also has the ability to focus very close to the lens in manual mode, so I use it for macros.

A lot of people will try to tell you that you can't take good photos without a several thousand dollar camera and several thousand dollar lenses, an expensive lighting setup etc etc. Don't listen to them. Photos are about more than just your equipment. There is so much that goes into photography. Yes, nicer lenses will get you sharper photos. Yes, having a DSLR will give you a greater degree of control to achieve the look you want. That doesn't mean you can't still get nice photos with a high end point and shoot, or that you can't take some nice photos with a regular point and shoot. It's really up to you how much time and effort you want to put into learning photography, taking, and then editing the photos. Anyone can take a snapshot, but it takes effort to take a good quality, pleasing photo. You can do it though. Thousands of people have taught themselves photography and become highly skilled professional photographers. Millions of people have taught themselves how to take nice family photos of their kids, pets, and extended family. You can too.
 If you're interested in learning more about photography, I suggest checking out Tony Northrup's book Stunning Digital Photography. It starts from the very beginning and teaches the basics, all the way up to professional quality photos. What I like about this book is that there are so many hours of video tutorials that comes with it (the Kindle version is best), and also access to their private Facebook group where you can get your photos critiqued as you learn. Getting your photos critiqued by other more experienced photographers is one of the best ways to learn, because they can tell you what you did good and what to better next time.
There are also thousands of videos on YouTube about taking photographs, posing, lighting photos, etc.
I want to take a moment to note here that not all photographers are outlandishly priced. There are many many photographers who are reasonably priced and who will give you dozens of beautiful photos. If you do decide to go to a professional, think about the following things: What is your budget? What kind of editing does the photographer do? Do they over edit? Do they edit at all? Does the price include prints or canvas prints? Does the price include digitals? Do you like the photos in the photographers portfolio? Does the photographer have good reviews? Is the photographer friendly and fun to work with? Will the photo shoot be in a studio or outdoors? How long will the shoot be? How many unique photos will you get as part of the package?
Stay tuned for more photography tutorials, tips and tricks!
Questions? Let us know in a comment below.


3) Dress For Photos
4) Edit Your Photos
I know not everyone has the time to learn Photoshop or Lightroom, or has the money to purchase these programs (although recently Adobe has been doing a 2 in 1 package of Photoshop and Lightroom for $10/month). You can find some free programs out there to edit your photos with. With a JPEG photo (This is what cell phones and regular digital cameras take) there's not too much you can do to fix lighting once the photo has been taken (so do it right in camera while you take the picture). But you can use a clone tool to remove blemishes, remove distracting elements from the background, level the horizon if you didn't do it in camera, and crop if necessary. Programs like Photoshop and Photoshop Elements also allow you to apply photo filters for an easy upgrade to your photos. Now there is such a thing as too much editing. I hate seeing photos that have been over edited, especially by those cell phone apps. They just look tacky when there is too much editing to a photo. Take a look at family photos you really like online, and see what kind of editing has been done to those photos. Then try to replicate that look. There are thousands of free tutorials out there online and on YouTube for editing photos.5) Choose A Pleasing Background
There are two really good ways to get a pleasing background. The first is to have a DSLR and lens that will give you the ability to get a shallow depth of field (the person will be in focus, but the background will be blurred). When you have a shallow depth of field, the background just becomes colors and you can't see the car, or trash can in the back of your subject. If you have a cell phone camera or regular point and shoot camera, this probably isn't an option for you. The second possibility falls under composition. Position your subject where there's not a lot of distracting objects behind them. You can put them up against a wall with a cool texture (think rock, concrete, or bricks), you can put them with foliage behind them, or lay them down on leaves, grass, or a hardwood floor and take the photo from above. The important thing is to look at the background before you take the photo. Things like people walking behind your subject, trash cans, cars, light poles, or garbage will all be distracting to the main subject.6) Think About Posing
A lot of times people say, "I'm not photogenic." That's not usually true though. Usually what happens is someone takes a photo of them straight on and it's not appealing. Even a skinny person can be made to look fat in a photo. This site has a few good tips on how to pose your subjects for flattering photos. One thing I've noticed, is that most kids automatically pose themselves in an way that is both comfortable and pleasing on camera. Sometimes they need direction, but not always. It's important that whoever you're photographing feels comfortable. If they are uncomfortable in a way you have posed them, it will translate to their face and to the photo, and the photo will look awkward. You want your photos to look natural and easy. It's ok to give direction, but make it clear that if your subject has an idea for how to sit or stand, you can try that too. Do not force your subject to pose in a certain way.7) Don't Have Your Subjects Say "Cheese""Say cheese," is dead. Don't do it. Don't ask others to do it. Having someone look at the camera and say "cheese" makes the person smile uncomfortably. The smile never reaches the eyes when they are forced to say something. Instead, talk to your subject, make them comfortable, joke with them, and capture the photo when they're laughing. Some adults and teens can smile if you tell them to without it looking awkward, but this is not the case with most people (and is almost never the case with children). A forced smile just includes the lips. A genuine smile reaches the eyes, and the corners of the eyes will crease slightly. Some of the best photos I have captured have been when the subject is laughing, or is completely relaxed and comfortable.
8) Try Different Angles
Once your subject is posed comfortably, move around them and try different angles. Also, have them look at the camera, have them look over your shoulder, have them look up, have them look down, have them look out in the distance. You don't have to do this every time, but by having them look somewhere other than the camera, and by having you move around them, above them, or below them (just don't shoot up the nose), you can capture a lot of different photos with different feelings as opposed to just straight on. One thing to remember with kids (and pets) is not to stand and shoot down at them. If it's an intentional downward angle, get up high, but generally speaking it's much better to get down on the level of the child so that the camera is at their eye level. Doing this makes the photo and composition look intentional, instead of just being a snapshot (spray and pray).9) Don't Get Frustrated
It's easy to get frustrated with children (especially young children) when taking photos. They don't want to sit still, they don't like the pose you want, they don't want to look at the camera, they are hungry or tired or overwhelmed and don't want to smile, or they might even be crying. It's ok. Take a step back and think about why you want to capture these photos. You want a happy memory, don't you? Or you want to capture them just as they are at this precious age. If they are uncomfortable, feel forced, or think mom or dad is angry at them, it will show in the photos and won't look like you captured a beautiful moment in their young life. Instead of getting frustrated, stay calm, talk with them, joke with them, maybe let them play for a while and follow them around (candids of kids can turn out great)! That being said, if they are crying, snap a few pictures of that too. Kids cry, and photos like that can be powerful or sometimes even cute.10) The Camera Isn't All About Mega Pixels
Yes, a higher mega pixel camera can give you a higher quality of photo, but this isn't the only thing that should determine your purchase or use of a specific camera. And while I'm thinking about it, let me point out that if you intend on printing your photos, your camera should be set to the highest file size and the finest quality. There are a lot of different things to consider when purchasing or using a camera. Think about the following things:
How often are you going to use the camera? Is it going to go everywhere with you? Are you going to be an amateur photographer, or are you good with snapshots? What is your budget?
If you want something small and compact that you can slip into a pocket, then a small point and shoot might be for you. Keep in mind that point and shoots usually have smaller file sizes (not so good for printing), only shoot in JPEG (not so good for editing), and give the user very little degree of control over what they're doing (if you're good with just auto, then go with this type of camera). This type of camera can be picked up for under a hundred dollars.
If you want to learn photography, shoot in RAW (more ability to edit photos later on), have a greater degree of control over your camera and still have the ability to use auto focus when you need it, then an entry level DSLR (Digital Single Lens Reflex) camera might be for you. You can pick these up for between $300-$600 for an entry level, and between $1,000-$3,000 for a professional level camera. If you buy one, try to get one that comes with a kit lens (usually this will be an 18-55mm). I have a Pentax K-30. I like it because it is 100% weather sealed and so are the lenses that are made for it. It has a nice point auto focusing system, and full manual control when needed. It's a very high quality camera for an entry level, and reasonably priced. The nice thing about Pentax is that they backwards engineer their cameras to fit with the previously made lenses.There is also a third option, and that is the high-end point and shoot. The high end point and shoots look sort of like a DSLR, but don't have a detachable lens. They have some degree of control over the camera outside of auto mode, but not complete control. I have a Canon SX-40 HS (shoots in RAW if you hack it.... I believe the Canon SX 50-HS does shoot in RAW though). This camera has a super zoom so I use it for wild life photography. It also has the ability to focus very close to the lens in manual mode, so I use it for macros.A lot of people will try to tell you that you can't take good photos without a several thousand dollar camera and several thousand dollar lenses, an expensive lighting setup etc etc. Don't listen to them. Photos are about more than just your equipment. There is so much that goes into photography. Yes, nicer lenses will get you sharper photos. Yes, having a DSLR will give you a greater degree of control to achieve the look you want. That doesn't mean you can't still get nice photos with a high end point and shoot, or that you can't take some nice photos with a regular point and shoot. It's really up to you how much time and effort you want to put into learning photography, taking, and then editing the photos. Anyone can take a snapshot, but it takes effort to take a good quality, pleasing photo. You can do it though. Thousands of people have taught themselves photography and become highly skilled professional photographers. Millions of people have taught themselves how to take nice family photos of their kids, pets, and extended family. You can too.
If you're interested in learning more about photography, I suggest checking out Tony Northrup's book Stunning Digital Photography. It starts from the very beginning and teaches the basics, all the way up to professional quality photos. What I like about this book is that there are so many hours of video tutorials that comes with it (the Kindle version is best), and also access to their private Facebook group where you can get your photos critiqued as you learn. Getting your photos critiqued by other more experienced photographers is one of the best ways to learn, because they can tell you what you did good and what to better next time.There are also thousands of videos on YouTube about taking photographs, posing, lighting photos, etc.
I want to take a moment to note here that not all photographers are outlandishly priced. There are many many photographers who are reasonably priced and who will give you dozens of beautiful photos. If you do decide to go to a professional, think about the following things: What is your budget? What kind of editing does the photographer do? Do they over edit? Do they edit at all? Does the price include prints or canvas prints? Does the price include digitals? Do you like the photos in the photographers portfolio? Does the photographer have good reviews? Is the photographer friendly and fun to work with? Will the photo shoot be in a studio or outdoors? How long will the shoot be? How many unique photos will you get as part of the package?
Stay tuned for more photography tutorials, tips and tricks!
Questions? Let us know in a comment below.
Thanks for sharing these ten tips. Photography is something that intrigues me, but I don't know much about it. There is a lot of helpful information here for a beginner like me. I especially like your advice of heading to YouTube to watch some tutorials.
ReplyDeleteI like the unifying color tip. We're hoping to get family photos done this year and we always struggle to choose outfits.
ReplyDelete